elasticsearch的template和mapping
mapping说明
elasticsearch update mapping and template on existing index,就是给字段添加相关的属性
| 属性 | 描述 | 适用类型 |
|---|---|---|
| index | 值为:analyzed,not_analyzed 或者 noanalyzed 索引且分析not_analyzed 索引但是不分析no 不索引这个字段,这样就搜不到默认值是analyzed | String其他类型只能设为no 或 not_analyzed |
| analyzer | 可以设置索引和搜索时用的分析器,默认下elasticsearch使用的是standard分析器除此之外,你还可以使用 whitespace、simple或english 这三种内置的分析器 | all |
| include_in_all | 默认下elasticsearch会为每一个文档定义一个特殊的域_all,它的作用就是每一个字段都将被搜索到,如果你不想让某个字段被搜索到,那么就在这字段里定义一个include_in_all=false ;默认值是true | all |
| norms | norms的作用是根据各种规范化因素去计算权值,这样方便查询;在analyzed定义字段里,值是true, not_analyzed是false | all |
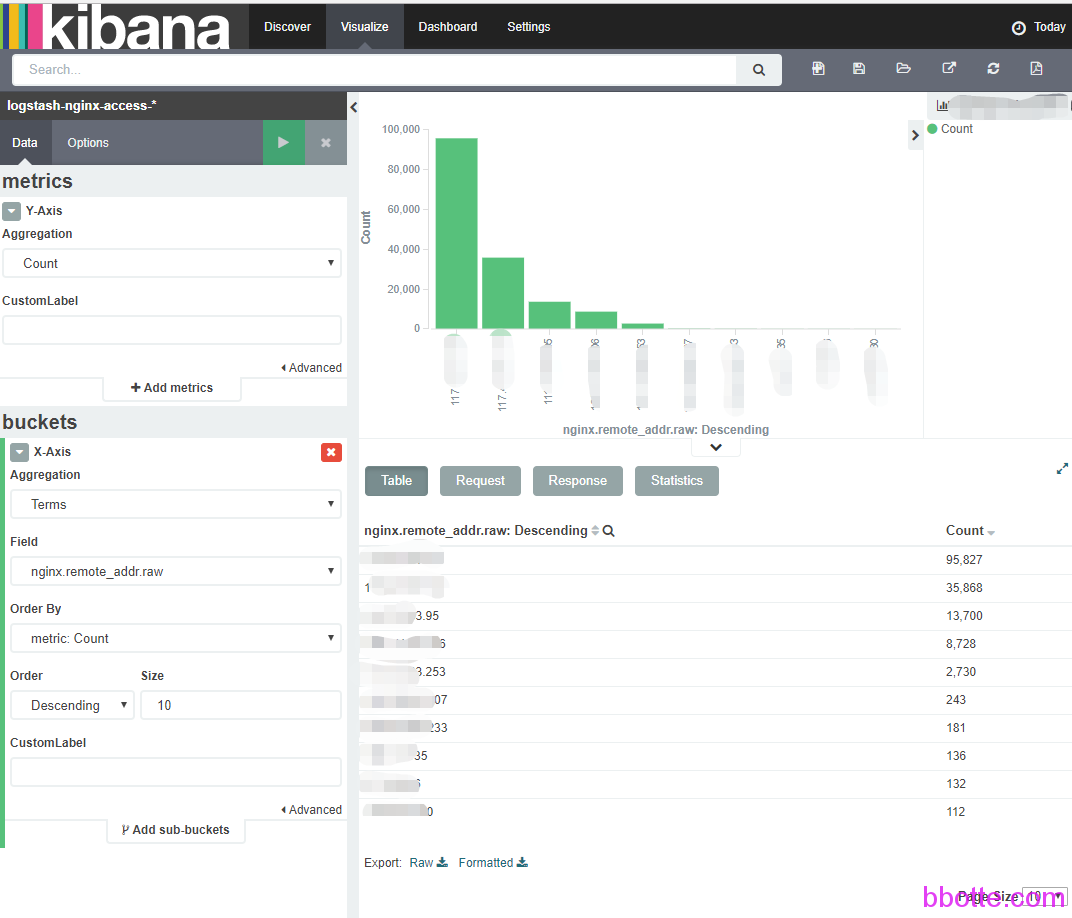
使用ELK免不了对template和mapping做更改,使其达到想要的结果。下面说明对模板和映射的修改,使其能出现.raw聚合
生成.raw有什么用?
可以做这个字段的统计,比如根据IP地址生成报表

[geoip.location is not of type geo_point] Index pattern does not contain any of the following field types: geo_point 这个问题是需要更新geoip的type,”type”: “geo_point” ,这个类型是动态的,因为经纬度带小数点,所以会识别为float
            "location": {
              "properties": {
                "lat": {
                  "type": "float"
                },
                "lon": {
                  "type": "float"
                }
              }
            },
{
  "www-2020.01.01" : {  #删除
    "mappings" : {
      "doc" : {
        "properties" : {
        ...  # 省略
          "geoip" : {
            "dynamic": "true",
            "properties" : {
            ...  # 省略
              "location" : {
                "type": "geo_point"  #修改
              },
            ...  # 省略
}  #删除
步骤总的来说,从现有的index导出模板,把现有的删除,修改这个模板后再导入到es,
对于mapping也一样,比如www-2020.01.01,先导出这个已有的mapping
curl “http://localhost:9200/www-*/_mapping?pretty” > 1.json
删除现在已经创建的index: www-2020.01.01
修改1.json的mapping
再PUT上去名字为www-2020.01.01的index
curl -XPUT “http://localhost:9200/www-2020.01.01” -H ‘Content-Type: application/json’ -d @1.json
最后刷新kibana的 index
一,更改template
先说几个常用的请求,以最原始的logstash-*索引为例:
# curl localhost:9200/_cat/indices?v         #查看现有的indices
health status index               pri rep docs.count docs.deleted store.size pri.store.size
yellow open   logstash-2016.08.26   5   1          1            0      9.2kb          9.2kb
yellow open   .kibana               1   1          2            1     11.8kb         11.8kb

# curl -XGET http://localhost:9200/_all/_mapping?pretty  #查看所有的mapping
{
  "logstash-2016.08.26" : {
    "mappings" : {
      "logs" : {
        "properties" : {
          "@timestamp" : {
....

# curl -XGET localhost:9200/_template  #查看所有的template,默认的template为logstash
{"logstash":{"order":0,"template":"logstash-*","settings":{"index":{"refresh_interval":"5s"}},"mappings":{"_default_":{"dynamic_templates":[{"message_field":{"mapping":{"index":"analyzed","omit_norms":true,"fielddata":{"format":"disabled"},"type":"string"},"match_mapping_type":"string","match":"message"}},{"string_fields":{"mapping":{"index":"analyzed","omit_norms":true,"fielddata":{"format":"disabled"},"type":"string","fields":{"raw":{"index":"not_analyzed","ignore_above":256,"type":"string"}}},"match_mapping_type":"string","match":"*"}}],"properties":{"@timestamp":{"type":"date"},"geoip":{"dynamic":true,"properties":{"location":{"type":"geo_point"},"longitude":{"type":"float"},"latitude":{"type":"float"},"ip":{"type":"ip"}}},"@version":{"index":"not_analyzed","type":"string"}},"_all":{"enabled":true,"omit_norms":true}}},"aliases":{}}}

# curl -XHEAD -i localhost:9200/_template/logstash  #确认是否存在logstash这个模板
HTTP/1.1 200 OK
Content-Type: text/plain; charset=UTF-8
Content-Length: 0

# curl -XGET localhost:9200/_cat/nodes                  #查看机器节点
# curl -XGET localhost:9200/_cat/health                 #查看本机的健康状态
# curl -XGET 'http://localhost:9200/_cluster/stats?human&pretty' #集群状态
# curl -XGET http://localhost:9200/_cat                 #其他接口自行查看
=^.^=
/_cat/allocation
/_cat/shards
/_cat/shards/{index}
/_cat/master
/_cat/nodes
/_cat/indices
/_cat/indices/{index}
/_cat/segments
/_cat/segments/{index}
/_cat/count
/_cat/count/{index}
/_cat/recovery
/_cat/recovery/{index}
/_cat/health
/_cat/pending_tasks
/_cat/aliases
/_cat/aliases/{alias}
/_cat/thread_pool
/_cat/plugins
/_cat/fielddata
/_cat/fielddata/{fields}
/_cat/nodeattrs
/_cat/repositories
/_cat/snapshots/{repository}
我们已经有了默认的logstash template,那么把现有的logstash模板导出一份,编辑一下格式,导入到一个index,然后在kibana的setting里面刷新此index即可。或者在网上找一个template导入进去
# curl -XGET localhost:9200/_template/logstash?pretty > e-template.json
# vim e-template.json
{
  "logstash" : {                 #delete这一行
    "order" : 0,                 #优先级,delete
    "template" : "logstash-*",   #修改名称,比如bbotte-*
    "settings" : {
      "index" : {
        "refresh_interval" : "5s"
      }
    },
    ...
    ...
    "aliases" : { }
  }                              #delete
}
因为导入的模板开头是模板的名称,所以把前面的index_name删除,中间添加或更改,得到一个模板,再put给elasticsearch,下面是put名字为bbotte的index(上面更改)
curl -X PUT http://localhost:9200/_template/bbotte -d @e-template.json
{"acknowledged":true}
删除今天的indices,要不就等到第二天自动生成新的indices
curl -X DELETE 'http://localhost:9200/tem_name'
ls /var/lib/elasticsearch/elasticsearch/nodes/0/indices/
在kibana刷新此index
 因为我们这里对template并木有做更改,所以日志不会有变化,查看template会有显示
# curl -XGET localhost:9200/_template
{"bbotte":{"order":0,"template":"bbotte-*","settings":{"index":{"refresh_interval":"5s"}},"mappings":{"_default_":......
需要出现.raw的聚合,其实更改的是template的mapping,所以请继续往下看
二,更新mapping
继续以默认的logstash-*为例
curl -XGET http://localhost:9200/_mapping                 #查看现有的mapping
curl -XGET http://localhost:9200/logstash-*/_mapping?pretty #查看logstash-*的mapping
或者 curl -X GET 'http://localhost:9200/logstash-*/logs/_mapping?pretty'
格式 curl -X GET 'http://localhost:9200/kibana里面的index-*/type/_mapping
格式为 /index_name/type/_mapping
1,第一种方式,先获取logstash-*的mapping,按格式修改。举个栗子?,下面是logstash生成index的mapping,以修改clientRealIp、uri这两个为例:
# curl -XGET http://localhost:9200/logstash-2016.08.10/_mapping?pretty
{
  "logstash-2016.08.10" : {       #delete
    "mappings" : {                #delete
      "logs" : {
        "properties" : {
          "@timestamp" : {
            "type" : "date",
            "format" : "strict_date_optional_time||epoch_millis"
          },
          "@version" : {
            "type" : "string"
          },
          "args" : {
            "type" : "string"
          },
          "bytes_sent" : {
            "type" : "string"
          },
          "clientRealIp" : {
            "type" : "string"          #delete
            "type" : "string",         #以下几行为添加
            "norms" : {
              "enabled" : false
            },
            "fielddata" : {
              "format" : "disabled"
            },
            "fields" : {
              "raw" : {
                "type" : "string",
                "index" : "not_analyzed",
                "ignore_above" : 256
              }
            }                          #以上几行为添加
          },
          "domain" : {
            "type" : "string"
          },
          "forwarded" : {
            "type" : "string"
          },
          "host" : {
            "type" : "string"
          },
          "method" : {
            "type" : "string"
          },
          "path" : {
            "type" : "string"
          },
          "port" : {
            "type" : "string"
          },
          "proto" : {
            "type" : "string"
          },
          "protocol" : {
            "type" : "string"
          },
          "remote_addr" : {
            "type" : "string"
          },
          "request_time" : {
            "type" : "double"
          },
          "status" : {
            "type" : "string"
          },
          "tags" : {
            "type" : "string"
          },
          "time" : {
            "type" : "string"
          },
          "uagent" : {
            "type" : "string"
          },
          "upstream_addr" : {
            "type" : "string"
          },
          "upstream_response_time" : {
            "type" : "double"
          },
          "uri" : {
            "type" : "string"       #delete
            "type" : "string",      #以下几行为添加
            "norms" : {
              "enabled" : false
            },
            "fielddata" : {
              "format" : "disabled"
            },
            "fields" : {
              "raw" : {
                "type" : "string",
                "index" : "not_analyzed",
                "ignore_above" : 256
              }
            }                       #以上几行为添加
          }
        }
      }
    }                    #delete
  }                      #delete
}
我们修改clientRealIp和uri后,put上去,如下:
curl -X POST localhost:9200/logstash-2016.08.10/logs/_mapping?ignore_conflicts=true -d '
#上面{}内的内容
'
{"acknowledged":true}
2, 第2种方式,可以用简单的方法,只提交需要更改的field,如果只修改uri:
对获取到的index做更改
      "uri" : {
            "type" : "string"
修改为:
      "uri" : {
            "type" : "string",
            "norms" : {
              "enabled" : false
            },
            "fielddata" : {
              "format" : "disabled"
            },
            "fields" : {
              "raw" : {
                "type" : "string",
                "index" : "not_analyzed",
                "ignore_above" : 256
              }
            }
      }

# cat e-mapping.json
{
  "logs" : {               #这个就是type,和下面curl -XPUT对应
    "properties" : {
      "uri" : {
            "type" : "string",
            "norms" : {
              "enabled" : false
            },
            "fielddata" : {
              "format" : "disabled"
            },
            "fields" : {
              "raw" : {
                "type" : "string",
                "index" : "not_analyzed",
                "ignore_above" : 256
              }
            }
      }
    }
  }
}

curl -s -X PUT 'http://localhost:9200/logstash-2016.08.10/logs/_mapping' -d @e-mapping.json
查看更新的mapping
# curl 'localhost:9200/_cat/indices?v'
health status index               pri rep docs.count docs.deleted store.size pri.store.size
yellow open   logstash-2016.08.10   5   1          2            0     18.1kb         18.1kb
yellow open   .kibana               1   1          5            0     27.5kb         27.5kb

格式 curl -XGET http://localhost:9200/name_of_index/_mappings/document_type
# curl -XGET http://localhost:9200/logstash-2016.08.10/_mapping/logs?pretty
同样的,删除今天的indices,在kibana刷新index
如果不清楚document_type格式,可以省略,其实就是mappings和properties中间的那一项,如果错误会得到错误提示
{"error":{"root_cause":[{"type":"index_not_found_exception","reason":"no such index","index":"logstash-2016.06.17","resource.type":"index_or_alias","resource.id":"logstash-2016.06.17"}],"type":"index_not_found_exception","reason":"no such index","index":"logstash-2016.06.17","resource.type":"index_or_alias","resource.id":"logstash-2016.06.17"},"status":404}

{"error":{"root_cause":[{"type":"action_request_validation_exception","reason":"Validation Failed: 1: mapping source is empty;"}],"type":"action_request_validation_exception","reason":"Validation Failed: 1: mapping source is empty;"},"status":400}
document_type可以从已有的template或mapping中获取,避免错误
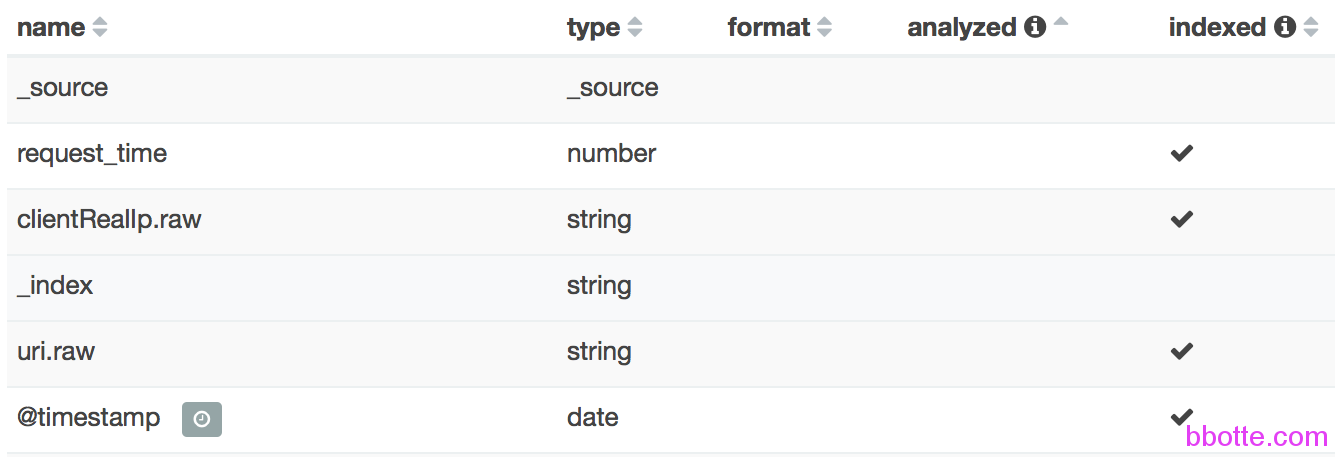
最后我们得到的结果:

2016年08月12日 于 linux工匠 发表