ossec线上安全监控的配置详细文档
- 说明
- 服务端安装
- 添加数据库支持
- 配置ossec
- 客户端安装
- 添加客户端
- ossec web界面
- 设置httpd配置
- analogi界面安装
说明
官网 http://ossec.github.io/ 下载页面 http://ossec.github.io/downloads.html 书籍 http://www.amazon.com/OSSEC-Host-Based-Intrusion-Detection-Guide/dp/159749240X 帮助文档 http://ossec-docs.readthedocs.org/en/latest/manual/index.html
- OSSEC是一个开源的基于主机的入侵检测系统,执行日志分析,文件完整性检查(md5,sha1),策略监控,rootkit检测,实时报警和积极响应。它可以运行在大多数的操作系统,包括Linux,MacOS,Solaris,HP-UX,AIX和Windows
- S/C运行模式,类似于zabbix
- ossec支持3种日志, Alert logging, firewall logging and event (archiving) logging
- server开通udp514(rsyslog),udp1514(ossec-remoted)端口监听,client会把实时状态数据发给server
- 集成fail2ban,iptables过滤,错误日志分析
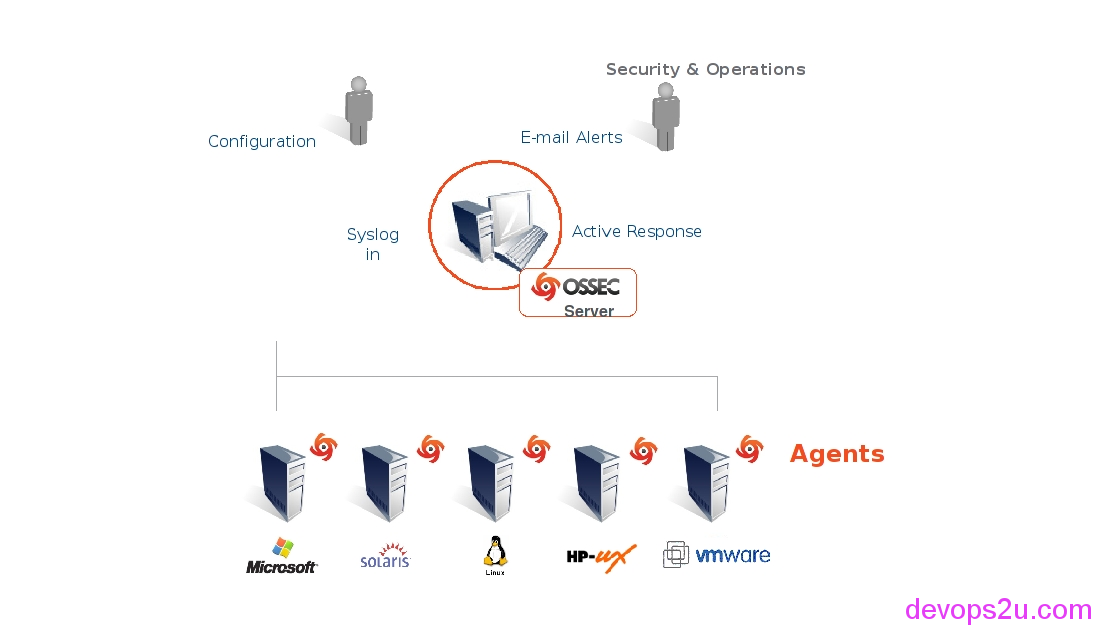
图片来源于ossec官网
服务端安装
# yum install mysql mysql-server mysql-devel  postgresql-devel httpd php php-mysql –y
# wget -U ossec http://www.ossec.net/files/ossec-hids-2.8.1.tar.gz
# tar -xzf ossec-hids-2.8.1.tar.gz
# cd ossec-hids-2.8.1
# ls
active-response  CONFIG   CONTRIBUTORS  etc      install.sh  README.md
BUGS             contrib  doc           INSTALL  LICENSE     src

目录说明:
active-response      执行操作的sh脚本
contrib              扩展,sh、perl脚本,txt说明文档
  ossec-batch-manager.pl      #批量添加主机
  ossec_report_contrib.pl     #表格显示ossec的日志
  ossec2mysql.pl              #记录mysql的实时日志

# cd src/
# make setdb                                 #如果将事件日志写入mysql
安装过程
# ./install.sh
en   #选择语言
Enter #继续
Server #安装为server
/usr/local/ossec #安装目录
3.1- Do you want e-mail notification? (y/n)[y]: y
   -What's your e-mail address? Your_mail@163.com
   -What's your SMTP server ip/host? 127.0.0.1

Enter # Running syscheck (integrity check daemon)
Enter # Running rootcheck (rootkit detection)
Enter #Active response enabled
Enter # firewall-drop enabled (local) for levels >= 6
Do you want to add more IPs to the whitelist? (y/n)? [n]: y  #设置ip白名单
   -IPs (space separated):

3.5- Do you want to enable remote syslog(port 514 udp)? (y/n) [y]:Enter
Enter #开始安装

安装完毕
- To start OSSEC HIDS:
    /usr/local/ossec/bin/ossec-control start

 - To stop OSSEC HIDS:
    /usr/local/ossec/bin/ossec-control stop

 - The configuration can be viewed or modified at /usr/local/ossec/etc/ossec.conf

 # /usr/local/ossec/bin/ossec-control help
Usage: /usr/local/ossec/bin/ossec-control {start|stop|restart|status|enable|disable}
添加数据库支持
# /usr/local/ossec/bin/ossec-control enable help
Invalid enable option.
Enable options: database, client-syslog, agentless, debug
Usage: /usr/local/ossec/bin/ossec-control enable [database|client-syslog|agentless|debug]

# /usr/local/ossec/bin/ossec-control enable database
# service mysqld start
# /usr/bin/mysql_secure_installation
# mysql -uroot -p
mysql> create database ossec;
mysql> grant INSERT,SELECT,UPDATE,CREATE,DELETE,EXECUTE on ossec.* to ossec@localhost identified by 'ossec';
mysql> flush privileges;
数据库主要提供日志存储,analogi图形化展示结果
配置ossec
# mysql -uossec -p ossec < ./ossec-hids-2.8.1/src/os_dbd/mysql.schema
Enter password:
# vim /usr/local/ossec/etc/ossec.conf  #在最后添加,wq! 强制保存
<ossec_config>
   <database_output>
       <hostname>localhost</hostname>
       <username>ossec</username>
       <password>ossec</password>
       <database>ossec</database>
       <type>mysql</type>
   </database_output>
</ossec_config>

/usr/local/ossec/etc/ossec.conf
<global>
    <email_to>you_mail1@163.com</email_to>     #收件箱
    <email_to>you_mail2@163.com</email_to>

<global>
    <white_list>127.0.0.1</white_list>         #白名单,api接口,cdn的ip
    <white_list>192.168.1.0/24</white_list>
服务启动, # service ossec restart #或者 # ./bin/ossec-control restart # ps aux|grep ossec 此时,邮箱已经收到邮件了
客户端安装
# tar -xzf ossec-hids-2.8.1.tar.gz
# cd ossec-hids-2.8.1
# ./install.sh
Y                        #默认为en
Enter                    #开始安装
Agent                    #作为代理
/usr/local/ossec         #安装目录
192.168.22.152          #添加server的ip,ip不要写错了
Enter   #Running syscheck (integrity check daemon)
Enter   #Running rootcheck (rootkit detection)
Enter   #active response

3.5- Setting the configuration to analyze the following logs:
    -- /var/log/messages
    -- /var/log/secure
    -- /var/log/maillog
    -- /var/log/nginx/error.log (apache log)
Enter                    #开始安装
添加客户端
服务器执行如下:

# /usr/local/ossec/bin/manage_agents
  (A)dd an agent (A).
  (E)xtract key for an agent (E).
  (L)ist already added agents (L).
  (R)emove an agent (R).
  (Q)uit.

A   #add
Please provide the following:
   *A name for the new agent: agent1
   *The IP Address of the new agent: 192.168.22.152   #agent端的ip地址
   *An ID for the new agent[001]: 001

Agent information:
   ID:001
  Name:agent1
   IPAddress:192.168.22.152
Confirm adding it?(y/n): y
Agent added.

  (A)dd an agent (A).
  (E)xtract key for an agent (E).
  (L)ist already added agents (L).
  (R)emove an agent (R).
  (Q)uit.

Choose your action: A,E,L,R or Q: E

Available agents:
  ID: 001, Name: agent1, IP: 192.168.22.152
Provide the ID of the agent to extract thekey (or '\q' to quit): 001

Agent key information for '001' is:
MDAxIGFnZW50MSAxOTIuMTY4LjIyLjI0MSBmYTcxYWE1ZWQx   # 安装agent的时候需要这个秘钥,
** Press ENTER to return to the main menu.

Choose your action: A,E,L,R or Q: Q
客户端执行如下:
# /usr/local/ossec/bin/manage_agents
  (I)mport key from the server (I).
  (Q)uit.

Choose your action: I or Q: I

Paste it here (or '\q' to quit):    #粘贴服务器生成的秘钥
MDAxIGFnZW50MSAxOTIuMTY4LjIyLjI0zSBmYTcxYWE1*********

Agent information:
  ID:001
  Name:agent1
   IPAddress:192.168.22.241

Confirm adding it?(y/n): y
Added.
** Press ENTER to return to the main menu.
Choose your action: I or Q: Q

# /usr/local/ossec/bin/ossec-control restart  #启动服务
在服务器端查看 # ./bin/manage_agents -l # ./bin/list_agents -c
被阻止的ip /etc/hosts.deny
ossec web界面
unzip ossec-wui-master.zip
mv ossec-wui-master /var/www/html/ossec
cd /var/www/html/ossec

# cat ossec_conf.php
/* Ossec directory */
#$ossec_dir="/var/ossec";
$ossec_dir="/usr/local/ossec";

# ./setup.sh
Setting up ossec ui...
Username: ossec              #生成.htpasswd密码
New password:
Re-type new password:
Adding password for user ossec
Enter your web server user name (e.g.apache, www, nobody, www-data, ...)
apache
Enter your OSSEC install directory path(e.g. /var/ossec)
/usr/local/ossec
You must restart your web server after thissetup is done.
Setup completed successfuly.
设置httpd配置
# vim /etc/httpd/conf.d/ossec.conf
<Directory /var/www/html/ossec>
   Order deny,allow
   Deny from all
   Allow from 192.168.22.0/24

#    Options FollowSymLinks   #外网访问配置,把上面注释或删除
#    AllowOverride None          #外网访问配置
#    Order deny,allow                #外网访问配置
#    allow from all                      #外网访问配置

Options -MultiViews
   AuthName "OSSEC AUTH"
   AuthType Basic
   AuthUserFile /var/www/html/ossec/.htpasswd
   Require valid-user
</Directory>
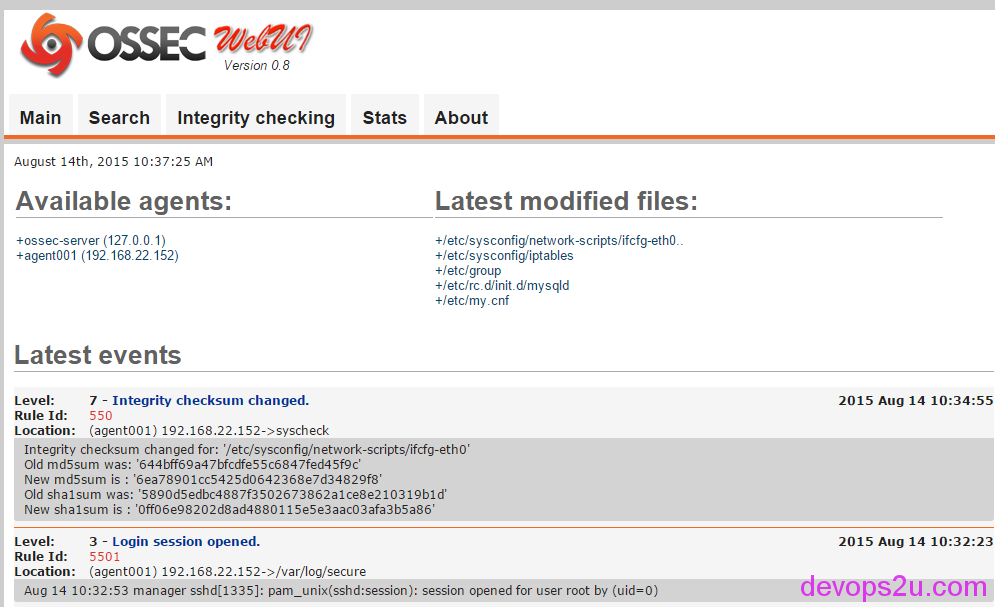
此时,ossec的图形化界面可以打开展示 bbotte.com
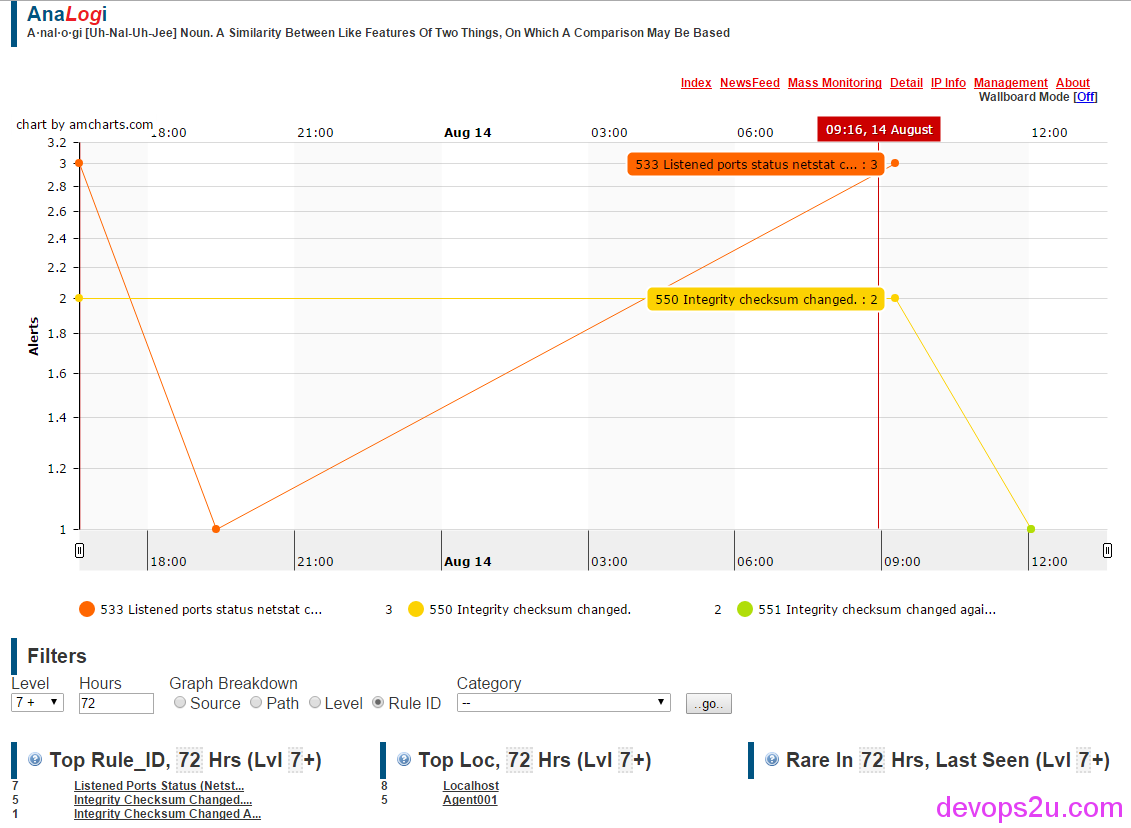
analogi界面安装
wget https://github.com/ECSC/analogi/archive/master.zip
unzip analogi-master.zip
mv analogi-master /var/www/html/ossec/analogi/
cd /var/www/html/ossec/analogi/
chown apache.apache -R *
cp db_ossec.php.new db_ossec.php

vim db_ossec.php
define ('DB_USER_O', 'ossec');
define ('DB_PASSWORD_O', 'ossec');
define ('DB_HOST_O', 'localhost');
define ('DB_NAME_O', 'ossec');

我们这一篇文章讲述了下面几个方面:
- 服务端安装
- 客户端安装
- 在服务端添加客户机
- 安装ossec web图形化界面
- 安装analogi图形化界面
ossec的高级使用部分将在下一篇继续介绍 http://bbotte.com/monitor-safe/advanced-configuration-of-ossec-on-line-security-monitoring/。
2016年03月14日 于 linux工匠 发表