Multi-Master Replication Manager for MySQL(mysql-mmm)
- 配置说明
- 安装mysql-mmm
- 配置mysql主主
- 配置mysql主从
- 配置mysql-mmm
- 启动服务mysql-mmm
- 检查及测试mysql-mmm
配置说明
mysql-mmm和mha是公司常用的数据库高可用方案,这一篇写mysql-mmm,下一篇写mysql-mha,每一种高可用方案思路各有不同,下面来看mysql-mmm
MMM (Multi-Master Replication Manager for MySQL) is a set of flexible scripts to perform monitoring/failover and management of MySQL master-master replication configurations (with only one node writable at any time).
The toolset also has the ability to read balance standard master/slave configurations with any number of slaves, so you can use it to move virtual IP addresses around a group of servers depending on whether they are behind in replication.
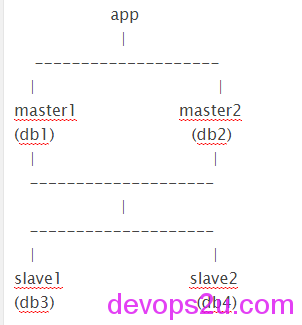
mysql-mmm官网 http://mysql-mmm.org/start mysql-mmm 系统CentOS 6.5 64位 Mysql版本 5.5.37,实验为5台测试机 monitor监控2主2从 master1和master2互为备份 slave1是master1的从 slave2是master2的从 ip地址 monitor 192.168.1.1 master1 192.168.1.2 master2 192.168.1.3 slave1 192.168.1.4 slave2 192.168.1.5
事前准备:
修改各主机的名字 /etc/sysconfig/network 比如monitor: HOSTNAME=monitor 修改各主机
 /etc/hosts
192.168.1.1 monitor
192.168.1.2 db1
192.168.1.3 db2
192.168.1.4 db3
192.168.1.5 db4
配置monitor和各agent双机互信修改文件可以很方便
# ssh-keygen -t rsa
# for i in db1 db2 db3 db4; do ssh-copy-id -i ~/.ssh/id_rsa.pub root@$i;done
# for i in db1 db2 db3 db4; do ssh $i ‘date’;done #检测
如果时间不同步则
ntpdate ntp1.aliyun.com ;hwclock -w
yum install ntp ntpdate -y
service ntpd restart
在其他节点和此节点时间同步 ntpdate monitor 如果提示ntpdate[35485]: no server suitable for synchronization found 是因为NTP server没有和其自身或者其他的server同步,则在 /etc/ntp.conf 添加以下,然后重启ntp服务 server 127.127.1.0 fudge 127.127.1.0 stratum 8
安装mysql-mmm
下面是两种安装方式:
安装方式1:
所有服务器执行
wget http://dl.fedoraproject.org/pub/epel/6/x86_64/epel-release-6-8.noarch.rpm
rpm -Uvh epel-release-6-8.noarch.rpm
monitor执行:
yum install mysql-mmm*
mysql agent 执行:
yum install mysql-mmm-agent
安装方式2:
yum install perl-CPAN #CPAN是perl的包管理器
perl -MCPAN -e shell#选择地区、国家和源
install Algorithm::Diff
install DBI
force install DBD::mysql
monitor要装的包:
# perl -MCPAN -e shell
cpan> install Algorithm::Diff
cpan> install Class::Singleton
cpan> install Log::Dispatch
cpan> install Log::Log4perl
cpan> install Mail::Send
cpan> install Proc::Daemon
cpan> install Thread::Queue
cpan> install Time::HiRes
cpan> install DBI
cpan>install DBD::mysql
agent要装的包:
# perl -MCPAN -e shell
cpan> install Algorithm::Diff
cpan> install DBI
cpan>install Log::Dispatch
cpan> install Log::Log4perl
cpan> install Mail::Send
cpan> install Net::ARP
cpan> install Proc::Daemon
cpan> install Time::HiRes
cpan>install DBD::mysql
cpan>install File::stat
cpan>install File:basename
tar zxf mysql-mmm-2.2.1.tar.gz
cd mysql-mmm-2.2.1
make instal
mysql-mmm文件位置及作用如下:
/usr/lib/perl5/vendor_perl/5.8.8/MMM                 MMM 使用的 perl 模块
/usr/lib/mysql-mmm                                   MMM 的脚本揑件
/usr/sbin                                            MMM 的命令保存路径
/var/log/mysql-mmm                                   MMM 的日志保存路径
/etc                                                 MMM 配置文件保存的路径
/etc/mysql-mmm                                       MMM 配置文件保存的路径,优先级最高
/etc/init.d/                                         agentd 和 monitor 的启劢关闭脚本
mysql安装略过
依次配置各个my.cnf 的server-id为1,2,3,4 比如db1:
server-id = 1 read_only = 1
配置mysql主主
master1:
mysql> grant replication slave on *.* to "zhuzhu"@"192.168.1.%" identified by "zhuzhu";
mysql> grant process, super, replication client on *.* to 'mmm_agent'@'192.168.1.%' identified by 'mmm_agent';
mysql> grant replication client on *.* to "mmm_monitor"@"192.168.1.%" identified by "mmm_monitor";
mysql> flush privileges;
mysql> show master status\G
查看master1 mysql-bin的日志文件名称和MASTER_LOG_POS的值,在master2上执行CHANGE MASTER TO MASTER_HOST 时使用,这里master1的MASTER_LOG_FILE=’mysql-bin.000010’,MASTER_LOG_POS=107
mysql> CHANGE MASTER TO MASTER_HOST='192.168.1.3',MASTER_USER='zhuzhu',MASTER_PASSWORD='zhuzhu',MASTER_PORT=3306,MASTER_LOG_FILE='mysql-bin.000006', MASTER_LOG_POS=1180,MASTER_CONNECT_RETRY=10;
mysql> start slave;
mysql> show slave status\G
master2:
mysql> grant replication slave on *.* to "zhuzhu"@"192.168.1.%" identified by "zhuzhu";
mysql> grant process, super, replication client on *.* to 'mmm_agent'@'192.168.1.%' identified by 'mmm_agent';
mysql> grant replication client on *.* to "mmm_monitor"@"192.168.1.%" identified by "mmm_monitor";
mysql> flush privileges;
mysql> show master status\G
查看master2 mysql-bin的日志文件名称和MASTER_LOG_POS的值,在master1上执行CHANGE MASTER TO MASTER_HOST 时使用,这里master2的MASTER_LOG_FILE=’mysql-bin.000006’,MASTER_LOG_POS=1180
mysql> CHANGE MASTER TO MASTER_HOST='192.168.1.2',MASTER_USER='zhuzhu',MASTER_PASSWORD='zhuzhu',MASTER_PORT=3306,MASTER_LOG_FILE='mysql-bin.000010', MASTER_LOG_POS=107,MASTER_CONNECT_RETRY=10;
mysql> start slave;
mysql> show slave status\G
配置mysql主从
slave1:
mysql> stop slave;
mysql> CHANGE MASTER TO MASTER_HOST='192.168.1.2',MASTER_USER='zhuzhu',MASTER_PASSWORD='zhuzhu',MASTER_PORT=3306,MASTER_LOG_FILE='mysql-bin.000010', MASTER_LOG_POS=107,MASTER_CONNECT_RETRY=10;
mysql> start slave;
mysql> show slave status\G
slave2:
mysql> stop slave;
mysql> CHANGE MASTER TO MASTER_HOST='192.168.1.3',MASTER_USER='zhuzhu',MASTER_PASSWORD='zhuzhu',MASTER_PORT=3306,MASTER_LOG_FILE='mysql-bin.000006', MASTER_LOG_POS=1180,MASTER_CONNECT_RETRY=10;
mysql> start slave;
mysql> show slave status\G
在两个slave上面创建monitor的账号:
grant replication client on *.* to "mmm_monitor"@"192.168.1.%" identified by "mmm_monitor";
grant process, super, replication client on *.* to 'mmm_agent'@'192.168.1.%' identified by 'mmm_agent';
flush privileges;
show slave status\G
在db1 新建用户,稍后用于测试:
mysql> grant all on *.* to user@"192.168.1.%" identified by "123456";
mysql> flush privileges;
在db1创建一个表,在db4测试是否同步成功:
mysql> create database testdb;
Query OK, 1 row affected (0.02 sec)
mysql> use testdb;
Database changed
mysql> create table user (id int(4),name varchar(10));
Query OK, 0 rows affected (0.07 sec)
mysql> insert into user values(1,"tom");
Query OK, 1 row affected (0.01 sec)
配置mysql-mmm
配置mmm_agent.conf
monitor: /etc/mysql-mmm目录下 mmm_agent.conf 注释#this db1
agent: db1(192.168.1.2)–db4(192.168.1.5) 上mmm_agent.conf 依次为this db1,,this db4
配置mmm_common.conf
monitor:
[root@monitor mysql-mmm]# vim mmm_common.conf
active_master_role      writer
<host default>
    cluster_interface       eth0
    pid_path                /var/run/mysql-mmm/mmm_agentd.pid
    bin_path                /usr/libexec/mysql-mmm/
    replication_user         zhuzhu
    replication_password    zhuzhu
    agent_user                  mmm_agent
    agent_password          mmm_agent
</host>
<host db1>
    ip      192.168.1.2
    mode    master
    peer    db2
</host>
<host db2>
    ip      192.168.1.3
    mode    master
    peer    db1
</host>
<host db3>
    ip      192.168.1.4
    mode    slave
</host>
<host db4>
    ip      192.168.1.5
    mode    slave
</host>

<role writer>
    hosts   db1, db2
    ips     192.168.1.100
    mode    exclusive
</role>
<role reader>
    hosts   db1,db2,db3,db4
    ips     192.168.1.101, 192.168.1.102,192.168.1.103,192.168.1.104
    mode    balanced
</role>
配置agent: 把此配置文件mmm_common.conf复制到各agent /etc/mysql-mmm
配置mmm_mon.conf
monitor:
[root@monitor mysql-mmm]# vim mmm_mon.conf
include mmm_common.conf
<monitor>
    ip                  192.168.1.1
    pid_path            /var/run/mysql-mmm/mmm_mond.pid
    bin_path            /usr/libexec/mysql-mmm
    status_path         /var/lib/mysql-mmm/mmm_mond.status
    ping_ips            192.168.1.2,192.168.1.3,192.168.1.4,192.168.1.5
    auto_set_online     60
    # The kill_host_bin does not exist by default, though the monitor will
    # throw a warning about it missing.  See the section 5.10 "Kill Host
    # Functionality" in the PDF documentation.
    #
    # kill_host_bin     /usr/libexec/mysql-mmm/monitor/kill_host
    #
</monitor>
<host default>
    monitor_user        mmm_monitor
    monitor_password    mmm_monitor
</host>
debug 0
启动服务mysql-mmm
先启agent,再启monitor,顺序不要错了 在各个agent节点启动服务# service mysql-mmm-agent restart 在monitor节点启动监控服务 # service mysql-mmm-monitor start monitor节点查看
[root@monitor mysql-mmm]# mmm_control show
db1(192.168.1.2) master/ONLINE. Roles: reader(192.168.1.102), writer(192.168.1.100)
db2(192.168.1.3) master/ONLINE. Roles: reader(192.168.1.101)
db3(192.168.1.4) slave/ONLINE. Roles: reader(192.168.1.104)
db4(192.168.1.5) slave/ONLINE. Roles: reader(192.168.1.103)

[root@monitor mysql-mmm]# mmm_control help
[root@monitor mysql-mmm]# mmm_control show
[root@monitor mysql-mmm]# mmm_control ping
[root@monitor mysql-mmm]# mmm_control checks all
db4  ping         [last change: 2014/12/31 15:15:22]  OK
db4  mysql        [last change: 2014/12/31 15:15:22]  OK
db4  rep_threads  [last change: 2014/12/31 15:15:22]  OK
db4  rep_backlog  [last change: 2014/12/31 15:15:22]  OK: Backlog is null
db2  ping         [last change: 2014/12/31 15:15:22]  OK
db2  mysql        [last change: 2014/12/31 15:15:22]  OK
db2  rep_threads  [last change: 2014/12/31 15:15:22]  OK
db2  rep_backlog  [last change: 2014/12/31 15:15:22]  OK: Backlog is null
db3  ping         [last change: 2014/12/31 15:15:22]  OK
db3  mysql        [last change: 2014/12/31 15:15:22]  OK
db3  rep_threads  [last change: 2014/12/31 15:15:22]  OK
db3  rep_backlog  [last change: 2014/12/31 15:15:22]  OK: Backlog is null
db1  ping         [last change: 2014/12/31 15:15:22]  OK
db1  mysql        [last change: 2014/12/31 15:15:22]  OK
db1  rep_threads  [last change: 2014/12/31 15:15:22]  OK
db1  rep_backlog  [last change: 2014/12/31 15:15:22]  OK: Backlog is null
查看db1的ip地址:
[root@db1 mysql-mmm]# ip a
1: lo: <LOOPBACK,UP,LOWER_UP> mtu 16436 qdisc noqueue state UNKNOWN
    link/loopback 00:00:00:00:00:00 brd 00:00:00:00:00:00
    inet 127.0.0.1/8 scope host lo
    inet6 ::1/128 scope host
       valid_lft forever preferred_lft forever
2: eth0: <BROADCAST,MULTICAST,UP,LOWER_UP> mtu 1500 qdisc pfifo_fast state UP qlen 1000
    link/ether 00:0c:29:0a:5e:93 brd ff:ff:ff:ff:ff:ff
    inet 192.168.1.2/24 brd 192.168.1.255 scope global eth0
    inet 192.168.1.104/32 scope global eth0
    inet 192.168.1.100/32 scope global eth0
    inet6 fe80::20c:29ff:fe0a:5e93/64 scope link
       valid_lft forever preferred_lft forever
检查及测试mysql-mmm
在monitor节点登录可以写入的VIP
# mysql -uuser -p123456 -h 192.168.1.100
mysql> insert into user values(2,"jerry");
在db4查看是否有此数据
mysql> select * from testdb.user;
+------+-------+
| id   | name  |
+------+-------+
|    1 | tom   |
|    2 | jerry |
+------+-------+
2 rows in set (0.00 sec)
模拟主mysql服务关闭,测试VIP是否会移动到master2 在db1 service mysqld stop monitor查看结果
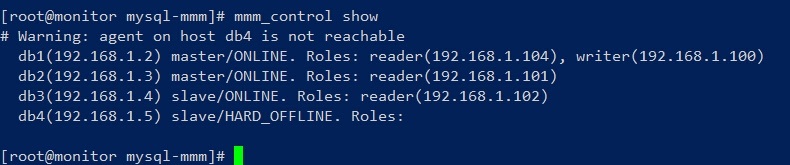
[root@monitor mysql-mmm]# mmm_control show
  db1(192.168.1.2) master/HARD_OFFLINE. Roles:
  db2(192.168.1.3) master/ONLINE. Roles: reader(192.168.1.101), writer(192.168.1.100)
  db3(192.168.1.4) slave/ONLINE. Roles: reader(192.168.1.102), reader(192.168.1.104)
  db4(192.168.1.5) slave/ONLINE. Roles: reader(192.168.1.103)
然后把db1的mysql服务再次启动,在monitor查看
[root@monitor mysql-mmm]# mmm_control show
  db1(192.168.1.2) master/ONLINE. Roles: reader(192.168.1.104)
  db2(192.168.1.3) master/ONLINE. Roles: reader(192.168.1.101), writer(192.168.1.100)
  db3(192.168.1.4) slave/ONLINE. Roles: reader(192.168.1.102)
  db4(192.168.1.5) slave/ONLINE. Roles: reader(192.168.1.103)
我们先手动把VIP迁移回db1
[root@monitor mysql-mmm]# mmm_control move_role writer db1
OK: Role 'writer' has been moved from 'db2' to 'db1'. Now you can wait some time and check new roles info!
[root@monitor mysql-mmm]# mmm_control show
  db1(192.168.1.2) master/ONLINE. Roles: reader(192.168.1.104), writer(192.168.1.100)
  db2(192.168.1.3) master/ONLINE. Roles: reader(192.168.1.101)
  db3(192.168.1.4) slave/ONLINE. Roles: reader(192.168.1.102)
  db4(192.168.1.5) slave/ONLINE. Roles: reader(192.168.1.103)
模拟slave节点当机:如果把db4直接关机,那么就出现下面的状态
monitor其他常用命令
mmm_control ping
mmm_control show
mmm_control checks all
mmm_control set_online db1
mmm_control move_role writer db1
mysql-mmm 数据一致性方面不是很好, mysql-mmm模拟master2(读)执行的时候加锁lock,往master1(写)插入数据后,把master1关闭(模拟当机),查看数据完整性 1,在master2(读)上面use testdb; lock tables user read; 2,这时候把master1(写)插入一条数据 use testdb; insert into user values (4,”marry”);再service mysqld stop 3,master2上show processlist; unlock tables; select * from testdb.user; 4,master1现在为OFFLINE,master2为写入 5,再把master1 service mysqld start,master1 select * from testdb.user; 数据正常 不过slave插入了2条相同数据(master1 sql服务关闭前插入一条,VIP转移master2后又插入一条)
以前的mysql-mmm problem,现在应该解决了 http://code.openark.org/blog/mysql/problems-with-mmm-for-mysql http://www.xaprb.com/blog/2011/05/04/whats-wrong-with-mmm/
2016年03月16日 于 linux工匠 发表